


---WARNING---
The process involves altering your userdata partition, please make sure to read carefully. Partitioning the wrong partition could brick your device, and you will need to use paid service to unbrick your phone if you messed up your partitions. Do it at your own risk!!! I'm not responsible for your device.
First of all, I'm not the developer of whatever being described here. All the credits go to Renegade Project's team. GitHub | Forum
This tutorial was adapted from the original tutorial here for OnePlus 6/6T. Here is a YouTube video that might help to understand the tutorial. Be careful on partitioning, the video is for OnePlus. For MIX 3, please follow tutorial below.
Required files
Everything you need are in here. Copy all these files to a separate USB drive. Or you can choose to download separately from original sources. Links will be given below.
Prepare partitions
- Backup your data as we are going to repartition userdata.
- Copy 'parted' onto your phone.
- Boot into TWRP and type below commands, don't copy texts in red:
DO NOT TOUCH ANY OTHER PARTITIONS BESIDES USERDATA. YOU HAVE BEEN WARNED!
cp /sdcard/parted /sbin/ && chmod 755 /sbin/parted
umount /data && umount /sdcard
parted /dev/block/sda
p //print list of partition, make sure your userdata partition is on sda22
rm 22 //delete userdata partition
mkpart esp fat32 1611MB 2000MB //create EFI partition (389MB)
mkpart pe fat32 2000MB 5000MB //create PE partition (3GB)
mkpart win ntfs 5000MB 70GB //create Windows partition (65GB)
mkpart userdata ext4 70GB 123GB //create userdata partition (53GB)
set 22 esp on
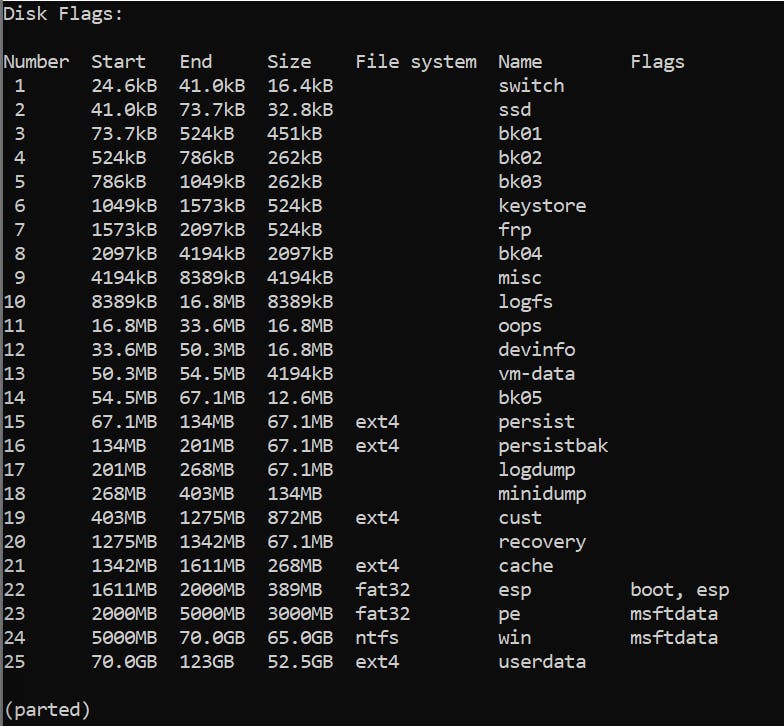
- Type 'p' again and your partition should be as below. Type 'q' to quit parted.
- Format the partitions, type below commands:
mkfs.fat -F32 -s1 /dev/block/sda22
mkfs.fat -F32 -s1 /dev/block/sda23
mkfs.ntfs -f /dev/block/sda24
mke2fs -t ext4 /dev/block/sda25
- Mount PE partition:
mount /dev/block/by-name/pe /mnt
- Copy PE files to PE partition, extract 20h2pe_new.zip and copy the files to either OTG or internal storage.
If you copied PE files to OTG:
cp -r /usb_otg/20h2pe_new/* /mntcp -r /sdcard/20h2pe_new/* /mnt
- Reboot to Bootloader for fastboot
Install Windows 11 onto the device
- Boot UEFI image. Download uefi image for perseus from original edk2 source here. In fastboot, type:
fastboot boot boot-perseus.img - You will now booted in PE. Connect USB OTG, mouse and keyboard to your phone.
- The PE is in Chinese, but I bet you can use it regardless the language.
- Navigate to your USB and extract Dism++. Link
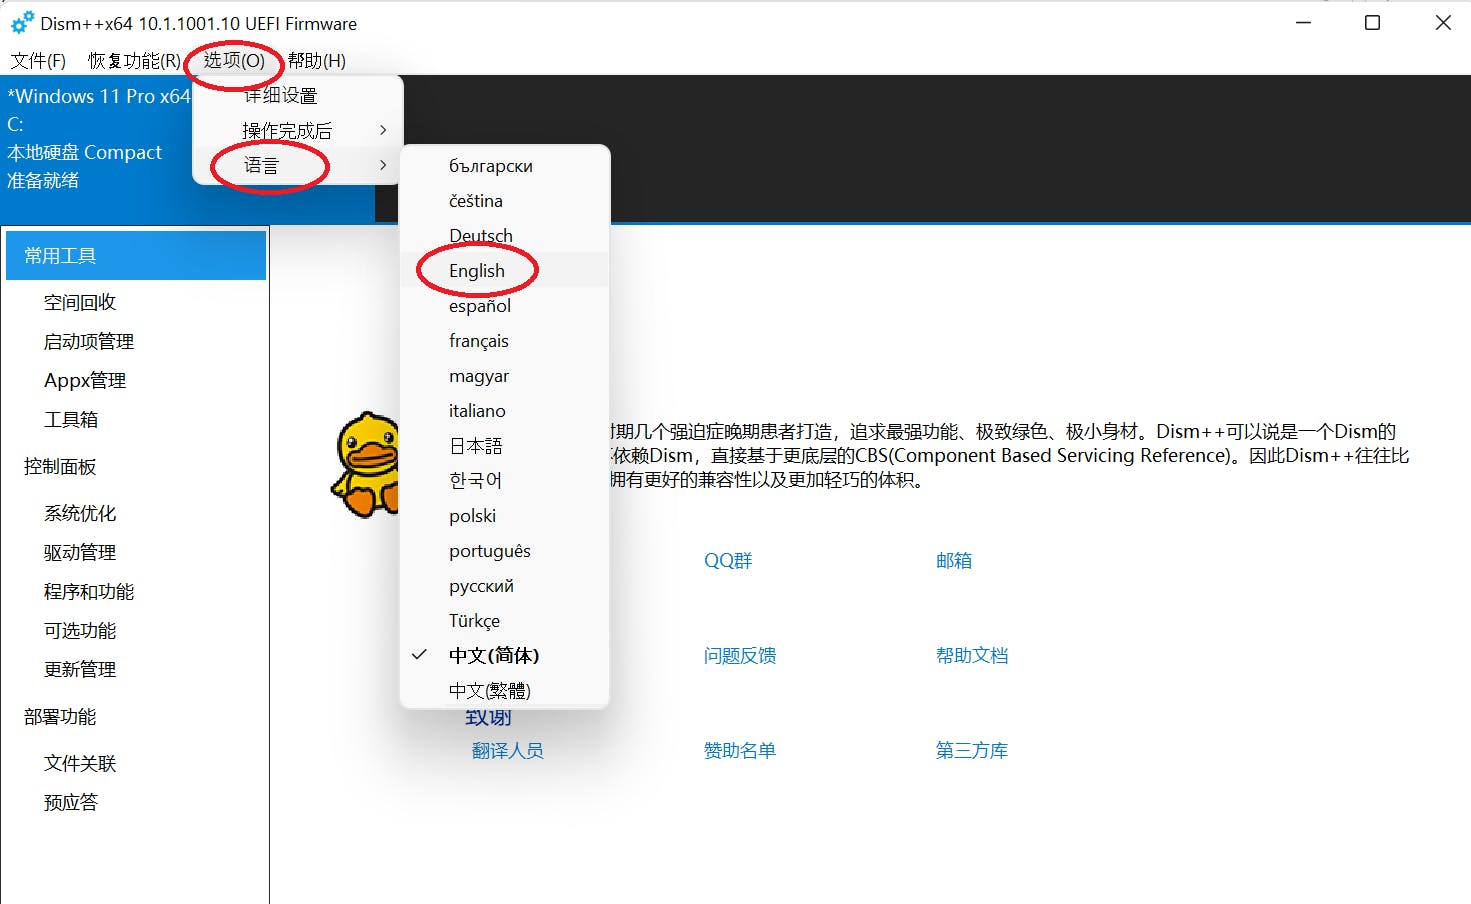
- Open Dism++ ARM64.exe
Dism++ will be open in Chinese, to switch to English, see below screenshot:
Click on File, Apply Image, choose Windows ISO, select Drive D, tick Add Boot and Format.

- For Windows ISO, you can either download from my first link or go to https://uupdump.net and download your own.
- For drivers, download latest drivers from edk2's repo
- Open terminal and follow instruction on edk2's repo to extract the driver, for example:
./extract.sh perseus - Wait a few minutes, after Dism++ completed applying image, click on Drive D in Dism++ and click Open Session.
- On the left hand side, click on Drivers, and click Add, pick up "output" folder in WOA Drivers that you extracted above and click OK. The drivers will now be added to the Windows 11.
Finally, enable testsigning and disable integritychecks
- In the command prompt in PE, type:
diskpart select disk 0 select part 22 assign letter=y exit - Navigate to your USB drive, open new.txt, copy both commands to cmd:
bcdedit /store Y:\efi\microsoft\boot\bcd /set {Default} testsigning on bcdedit /store Y:\efi\microsoft\boot\bcd /set {Default} nointegritychecks on - Shutdown the phone
shutdown -s -t 0First boot
- Boot your phone to bootloader (fastboot). You need to do this every time you want to boot into Windows 11
fastboot boot boot-perseus.img - Once you boot successfully into Windows 11, finish the set up screen.